
Email Domains
Before you can send emails from your domain using Solidarity Tech, you must add and verify your Email Domain. This process proves that you own the domain and authorizes Solidarity Tech to send emails on its behalf.
Important: DNS configuration is your responsibility. Solidarity Tech provides the DNS records you need to add, and the dashboard will tell you whether verification succeeded or failed. However, the actual process of logging into your domain registrar and adding DNS records is outside of Solidarity Tech's control. If you need help navigating your domain registrar's DNS settings, you must contact your domain registrar's support team directly (e.g. GoDaddy support, Namecheap support, Cloudflare support, etc.). Solidarity Tech support cannot configure DNS records on your behalf or troubleshoot issues within your domain registrar's control panel.
Adding Your Email Domain
Navigate to Settings → Email Domains in the Solidarity Tech dashboard, and click "Add email domain". Enter the domain you want to send emails from, without www (e.g. yourorganization.org). This menu item needs the Manage Email Domains permission.
Verifying Your Email Domain
Once you've added the domain, you will be taken to a page showing the DNS records you need to add to your domain's DNS settings. You will see 7 records: 3 CNAME records, 3 TXT records, and 1 MX record. Only the 3 DKIM CNAME records decide verification. Add all 7 records for the best deliverability.
The 3 CNAME records authenticate your domain with DKIM. The TXT records configure DMARC, SPF for your root domain, and SPF for bounce handling. The MX record enables custom return-path alignment for improved deliverability. An optional BIMI record can also be added to display your logo in supported email clients.
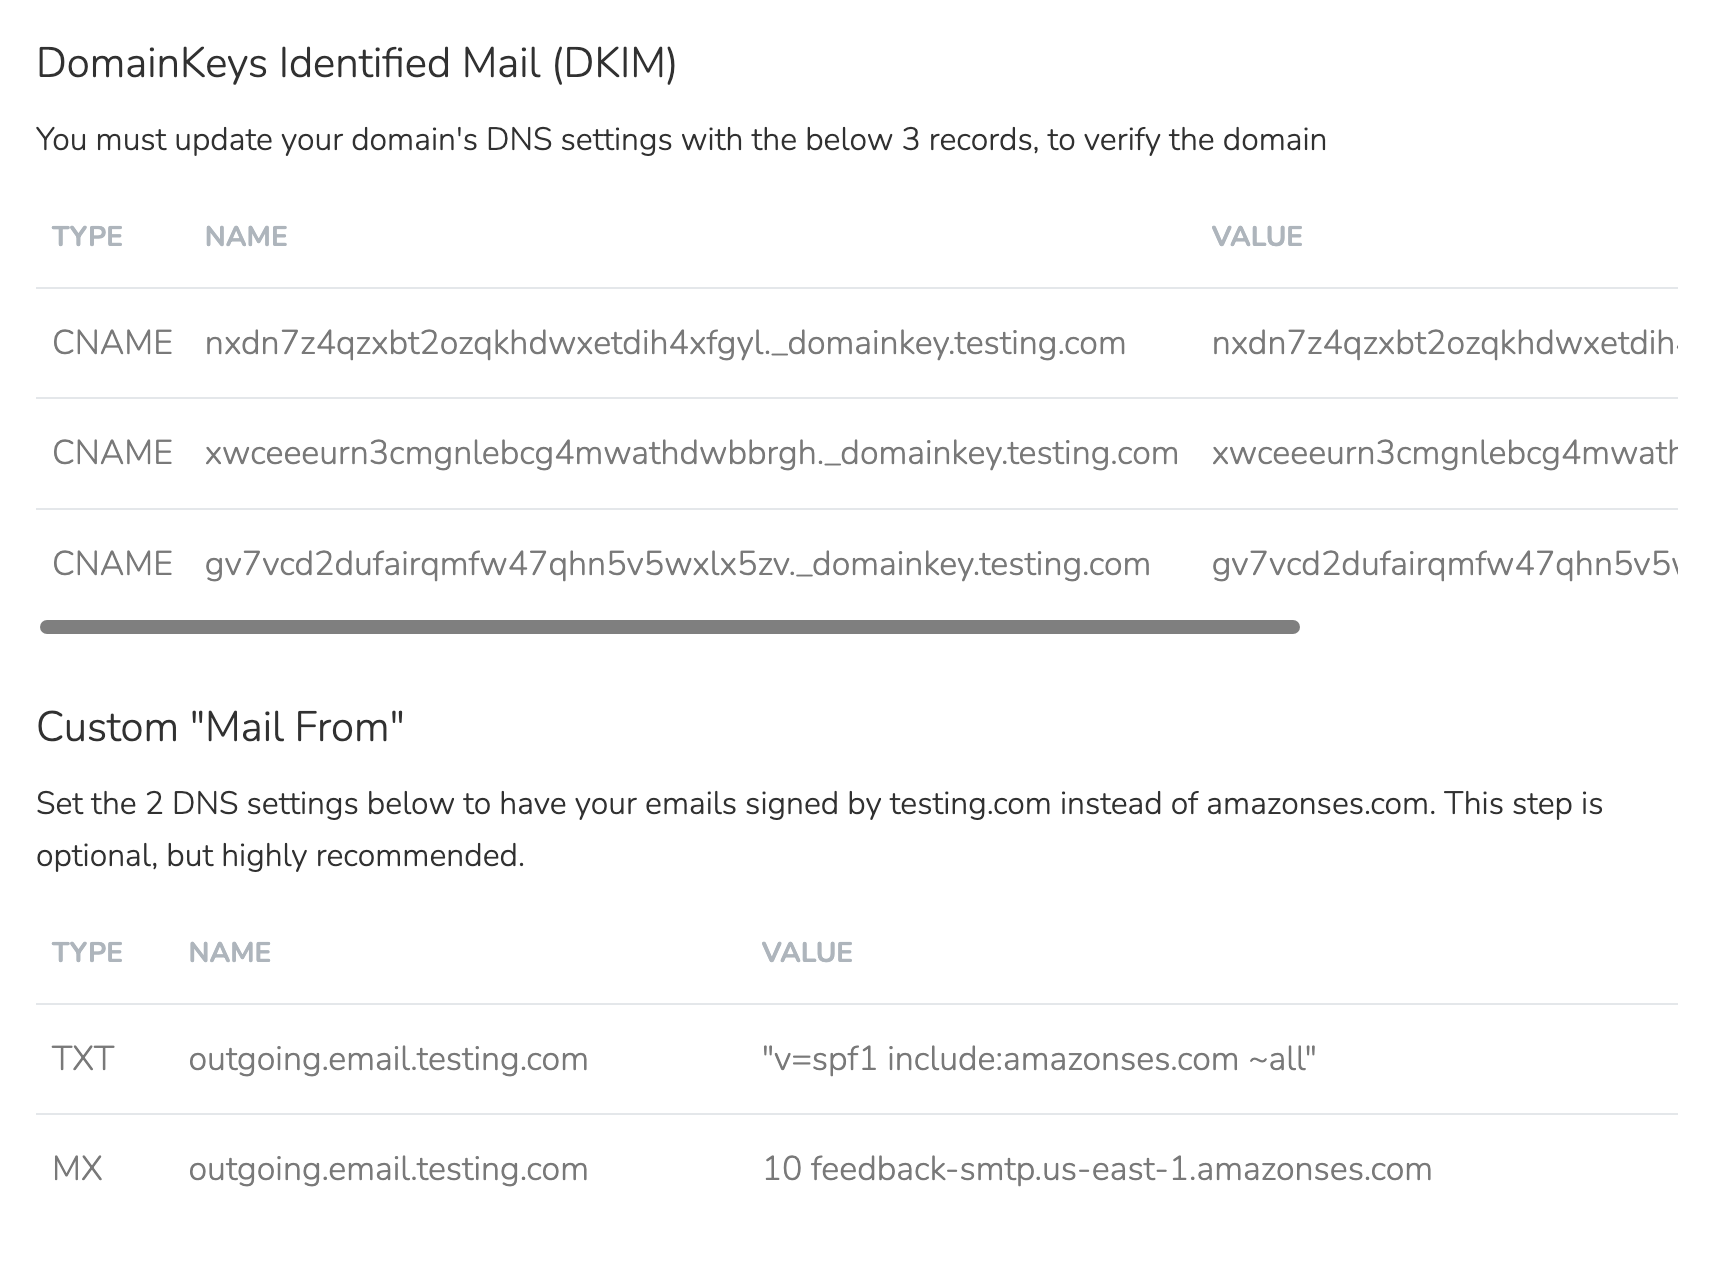
To add these records, you will need to:
- Log in to your domain registrar's website (e.g. Namecheap, GoDaddy, Cloudflare, Squarespace, etc.)
- Find the DNS settings or domain management area
- Add each record exactly as shown in the Solidarity Tech dashboard. If your domain already has an SPF record or a
_dmarcrecord, do not add a second one.
Each DNS record entry has a Type (CNAME, MX, etc.), a Name, and a Value. The 3 DKIM records must match exactly for verification to succeed.
The process for accessing and editing DNS records varies by provider. Here are links to instructions for several popular providers:
Once you have added all 7 records, return to the Solidarity Tech dashboard and click the "Verify Domain" button:

It may take anywhere from a few minutes to several hours for DNS changes to propagate across the internet. If verification does not succeed immediately and you are confident the records are correct, wait a bit and try clicking "Verify Domain" again.
Troubleshooting DNS Records
Common Issues:
| Issue | Solution |
|---|---|
| Domain still "Pending" after 24+ hours | Check the 3 DKIM CNAME records first, because only they decide "Pending" or "Verified". After you click "Verify Domain", the message names the DKIM problem. Even small typos will cause verification to fail. |
| CNAME record conflicts | DNS rules do not allow a CNAME record and any other record on the same name. If you see errors, contact your domain registrar's support. |
| "Record already exists" error | You may need to update an existing record rather than create a new one. |
| SPF record conflicts | You can only have one SPF TXT record per domain. If you already have an SPF record (e.g. for Cloudflare email forwarding), combine them into a single record by merging the include: directives. |
Domain name auto-appending: Most DNS providers (GoDaddy, Namecheap, Cloudflare, etc.) automatically append your domain name to record names, so you only need to enter the subdomain portion shown in the dashboard. However, some providers require the full record name including your domain. If verification fails, try it the other way. Similarly, some providers append your domain to the Value/Target field. If that happens, add a trailing dot (.) to the end of each CNAME value (e.g.,abc123.dkim.example.com.). The trailing dot tells your DNS provider it's a complete domain name and should not be appended to.
Do not change the MX records on your root domain, because the MX record goes on the outgoing.email subdomain only. If your provider combines Priority and Value in one field, enter 10, a space, and then the value shown in the dashboard.
Provider Specific Notes:
- Cloudflare: Make sure the proxy toggle (orange cloud) is OFF for CNAME records used for email verification.
- Squarespace: Open your domains dashboard. Click your domain. Click DNS. Then click DNS Settings. Add the records under Custom Records. Squarespace adds your domain name after the Name value, so enter only the subdomain portion.
- GoDaddy: Select your domain to open the Domain Settings page. Then select DNS. In the Name field, enter only the prefix, without your domain name.
- Namecheap: Use Advanced DNS in your domain dashboard.
Verification timeline: DNS changes typically propagate within a few minutes, but can take up to several hours. If your records look correct but verification still fails, click "Verify Domain" again after waiting.
Still stuck? Use a DNS lookup tool like mxtoolbox.com or digwebinterface.com to verify your records are publicly visible. For all other DNS issues (records not appearing, errors adding records, conflicting records), contact your domain registrar's support team.
Restricting Domain Usage
Once a domain is verified, you'll see a "Restrict to This Scope Only" toggle on the domain settings page.
When enabled, each sender on this domain is available only at the scope where it was created and at the parent scopes above it. Users at child scopes (like chapters under an organization) cannot create a sender on this domain or move a sender onto it. A sender that already lives at a child scope stays visible there.
Parent organizations may enable this setting to protect their domain's sender reputation.
Updated 1 day ago